Nice and healthy without losing that weekend feeling

Your Last Mouthful

Breakfast- Potato and Poached Egg Hash

I chose this recipe because it sounded like a naughty weekend breakfast but it is surprisingly only 194 calories per portion and the portion is a fair size for breakfast.

I love fried potato and bacon, who doesn’t? And the addition of the tomatoes and spring onions made it taste fresh and less stodgy.

The cooking times for this were spot on but that is assuming you have already cooked and chilled the potatoes or have some left over from the day before. If you need to cook the potatoes at the same time, add another 20 minutes to the recipe. Fried potatoes work better with cold potatoes but it isn’t essential.

I love poached egg and you can’t beat a nice runny one in my opinion but that of course is up to you.

Recipe- serves 4

194 calories per portion, 10 minutes…

View original post 159 more words

Ahhh soup!

Here at Sticky central we are trying to combat the post-Christmas blues and preparing for the blizzard that the forecasters say is upon us. What better treat than a yummy, scrummy soup to warm you up and provide you with that all important nutritional goodness to keep you on track to a fit and healthy 2013. Here are two of our favourites:

Carrot and ginger warmer

1 tablespoon olive oil
1 onion, diced
8 medium carrots, diced
1cm fresh ginger, pureed/ finely chopped
500ml chicken or vegetable stock

1. In a large saucepan, heat the olive oil and cook the onions until translucent.
2. Next add the carrots and ginger and cook on a low heat for a few minutes.
3. Add the stock and bring to the boil.
4. Reduce the heat and simmer until the carrots have softened and some of the water has evaporated.
5. Using a handheld blender, blitz the mixture until smooth. (Careful with the hot liquid here as it can be a bit messy)
6. Serve with fresh crusty bread or enjoy on its own.

Canarian Garbanzada

This Spanish favourite can be adapted to your own tastes or made with whatever you have in.

1 tablespoon olive oil
1 onion, diced,
1 carrot, diced
1 potato, diced
1 clove garlic, finely diced
60g chorizo, diced
250ml vegetable or chicken stock
200g tinned chopped tomatoes
130g cooked chickpeas

1. In a large saucepan, heat the olive oil and gently cook the onion and garlic until translucent.
2. Add the carrot, potato and chorizo and cook for 5 mins.
3. Add the stock, tomatoes and chickpeas and cook until the vegetable are soft (around 20 minutes should do)
4. Serve with warm crusty rolls.

Head over to our Facebook page and share you own soup recipes. Enjoy!

Ballroom Dancing

Strictly Come Dancing has just finished with gymnast and Olympic golden-boy, Louis Smith, lifting the trophy. The competition showed the celebrities taking on a new challenge; getting fit and having fun. With this in mind, I headed to Dance World in Newport to put my best foot forward.

In truth, I started to learn a few years ago but haven’t been for quite some time. I went to an intermediate class and was pleased to find the first dance a nice, steady waltz. Trying to keep the hold certainly worked my upper arms and shoulders. Here is a look at the basic moves with ballroom master, Len Goodman. (Video care of Learn to Dance Youtube channel)

Dancing a waltz  for an hour can burn up to 200 calories. That’s enough for about 3 skinny lattes. The waltz also helps to stretch the body and improve posture. It is a great form of aerobic exercise and, done properly, needs a lot more stamina than most people think.

The next dance I attempted was the samba. This party dance certainly gets the heart pumping with its quick tempo, lively steps and bounce action. Here’s Len doing what he does best again.

The samba can burn another 200 calories an hour (if not more!) when danced properly. This can be a great cardio workout and is brilliant for toning legs and improving flexibility in the hips.

I certainly felt as if I had a good workout and lots of fun too. It is great meeting new people and getting to learn a new skill whilst improving your health.

Why not try your own local dance class? Remember, don’t be shy or embarrassed about trying something new and in a beginners’ class, everybody is in the same position.

Dancing is not just for seniors either, all ages, shapes and sizes attend classes!

Dance World offers lessons for beginners on Tuesdays and Thursdays, 7pm-8pm, from as little as £5.

BBC News: ‘Confusion’ over how active we should be

Here’s an interesting article about how active an adult should be in their daily lives.

Challenge 3: Get fit and healthy

Eaten too much Christmas pudding? Can’t get that bow tie to do up comfortably? Well, it is a new year and a time for a new challenge. It may sound a little unimaginative but this month’s challenge is a not a bake or a make but a do: get fit and healthy.

It’s been said that January is the worst month to start anything, especially in the way of exercise, what with the cold dark mornings and evenings. You really wish you could hibernate don’t you?

The aim of challenge number three is to find easy and pleasant ways to get in tip-top condition this month. That will mean finding healthy, nutritious and satisfying recipes (expect lots of lovely, warming soups) and alternative ways to get that bit of exercise that your body probably needs.

So… let’s get to it!

How to tie your new ties

You’ve made your beautiful ties and bow ties from scratch and now you want to wear them. (Ideal for a New Year’s Eve party!) The question is, how do you tie a tie? Well, never fear, help is at hand thanks to some rather great videos.

Tie

The first is care of the Spanish department store, El Corte Inlgés. This video gives and easy demonstration on how to tie the most s straight-forward, standard knots.
a) the half Windsor
b) simple
c) double
d) Windsor / full Windsor
e) Oriental / School boy

Bow tie

The second is a demonstration on how to tie a bow tie. It is provided by men’s fashion blog, DYN Style Advice for Men.

Packing up your pudding

It’s Christmas Eve and I had better get wrapping if I am going to finish before Father Christmas arrives in the morning.

Luckily I have decided how to wrap my Christmas puddings. And here they are:

Pudding wrap 1

I decided to go for a traditional feel with the use of brown paper and string and thought homemade pompoms made then look a little bit more special.

When wrapping, I first covered the pudding with a double layer of baking parchment and then a layer of thick foil.

Pudding wrap 2

Then I wrapped then like a present using brown paper before tying firmly with string.

Pudding wrap 3

Merry Christmas and a happy new year from stickybcktastic.jpg

How to make a skinny bow tie: Gingham style

So we have made our skinny tie but bow ties are in fashion so let’s make one of those too.

Bow 11

You will need:

1/2 metre of fabric (Look in charity shops for material, refashion old clothes or check out the off cuts bin in upholstery stores. See Seamless for ideas about make-do-and-mend.)
1/2 metre iron-on lightweight interfacing
Dressmaking pins
Needle
Cotton (your choice)
Sewing machine
Iron
Scissors
Copy of tie pattern

Step 1

Print out the pattern for a skinny bow tie. As with the skinny tie, there are lots of free patterns available. Here I am using one from Angela Osborn.

Attach the pattern to the material and and cut out.

Bow 1

You will need four identical pieces of fabric and two pieces of interfacing.

Bow 2

Step 2

Iron the interfacing on to the reverse of two of the sides of fabric.

Bow 3

Step 3

Pin and tack each pair together, right sides facing, so that when opened will create one long tie.

Bow 4

Step 4

Sew and open out before pressing and trimming any excess material.

Bow 5

Step 5

Pin and tack the two new pieces together with the right sides facing.

Bow 6

Step 6

Sew all the way around about 1cm from the edge but leave a gap of about 10cm along the middle of one side in order to turn out later.

Bow 7

Step 7

Using the gap that you have left in the side, turn the tie the right way in. (You may need the help of that trusty chopstick again!)

Bow 9

Step 8

Once complete, press the tie to make the bow tie shape. Carefully stitch the open side using a ladder stitch. This will close up the gap with an invisible stitch. Pass the needle through the lower flap.

Bow 9a

Then pass the needle through the upper flap.

Bow 9b

Finish by pulling tight and secure with a double knot.

Bow 9c

Step 9

Press once again to finish the tie.

Bow 10

That’s it! Now you can make ties to your heart’s content.


Bow 11


Bow 12

How to make a skinny tie

Here it is: how to make a skinny tie from scratch.

You will need:

1/2 metre of fabric (your choice)
1/2 metre iron-on lightweight interfacing
Dressmaking pins
Needle
Cotton (your choice)
Sewing machine
Iron
Scissors
Copy of tie pattern

Step 1

Print out the pattern for a skinny tie. There are many available on the internet for free. Here I am using one from a lovely blog called See Kate Sew but others are available with a quick Google search.

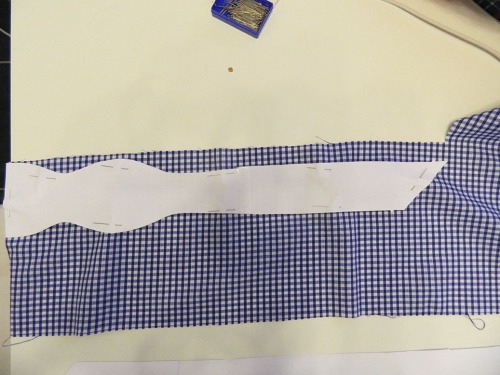
Attach the pattern to the material using pins and cut around the edge.
Tie 1

Step 2

Use the paper pattern to cut out identical pieces of interfacing.
Tie 2

Step 3

Iron the interfacing onto the back of the fabric. (You will be able to see the glue on one side of the interfacing. This is the side that sticks to the fabric) You will only need a warm iron.
Tie 3

Step 4

Use the pattern once again to cut out two end pieces that will be used for backing.
Tie 4

Step 5

Pin and tack the end pieces to the main tie sections. They heed to have the right sides facing as we will invert it later. (If you are proficient with a sewing machine you can just pin. I prefer to tack as well so I can remove the pins when sewing. Tacking is when you very loosely sew fabric. The stitches can be wide and do not need to be neat as they will be unpicked and discarded later.)
Tie 5

Step 6

Sew around the outside edges of this section about 1cm from the edge. Repeat for the opposite end.
Tie 6

Step 7

Remove pins or unpick the tacking. Carefully turn these pockets inside out. Use a chopstick to push the corners out.
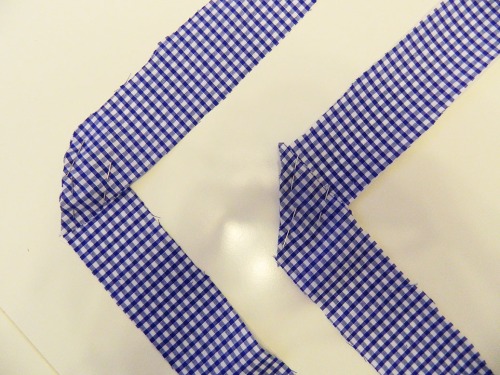
Tie 7

Step 8

Lay the two pieces, right sides facing, and pin and tack the ends so when opened out will create one long tie.
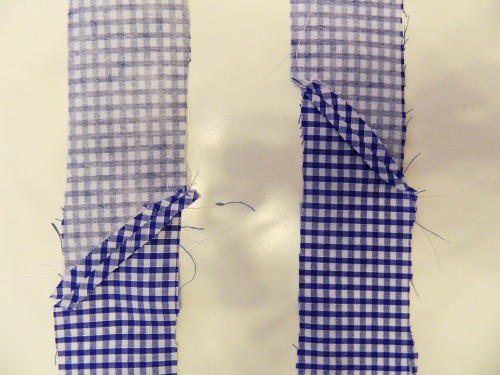
Tie 8

Step 9

Sew this edge about 1cm in. Remove pin or tacking, fold flaps out and iron flat. Trim any excess material. Tie 9

Step 10

Pin and tack all the way down the edges of the tie, folding in by about 1cm.
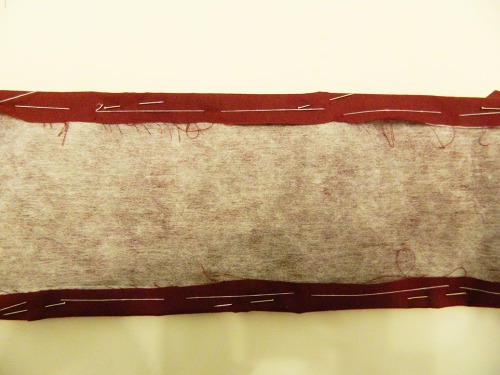
Tie 10

Step 11

Sew all the way down each side to be left with a neat wide tie shape and remove the pins or tacking.
Tie 11

Step 12

Cut out a small rectangle of material, a little over the width of the tie. It should be  about 10cm by 4cm. Fold and sew along the longest edge with the right sides facing. This will create the keeper loop on the back of the tie. (Of course, you can omit this if you prefer)
Tie 12

Step 13

Turn the loop the right way in using a chopstick. (This can be a little tricky!)

Tie 13

Step 14

Now to make the tie skinny. Fold over one side of the tie until it reaches the middle. Fold the other side to just cover it. Pin the tie all the way up. Check at the top and bottom to see if you are creating a neat triangle shape at the ends. Use a slip stitch to join the two sides. This is done by sewing up through and out the seam or edge of the top layer.
Tie 14

Then, sew through the bottom layer at the point where the two overlap. (Be sure not to sew through to the right side of the tie on either side.) Pull tightly to bring the opening together.

Tie 15

Step 15

About 6-8cm from the bottom of the larger blade of the tie sew the keeper loop under the seam of the tie with a normal stitch, but keep it neat.
Tie 16

Step 16

Carefully iron the loop so that is lies flat across the width of the tie. Then press the whole tie, making sure there are no creases in the main front blade.
Tie 17

That’s it! You’ve finished your skinny tie.

Tie 18

Once you have mastered the technique, why not experiment with different fabrics  and create unique pieces; ideal as gifts or for sprucing up an outfit.

Tie 19

Hang on in there!

Sorry for the radio silence but I have been scampering away trying to perfect my sewing skills ready for the big make. Note to self: invest in 10 thimbles! Also, will be posting info about packing up your pudding.